Saturday, May 8, 2010

Ubuntu 10.04 Netbook Edition (UNE)

First, download the Ubuntu UNE file, and prepare the bootable USB that you will be using to install UNE to your netbook PC.  The steps and download link can be found here: http://www.ubuntu.com/getubuntu/download-netbook

You must also know how to setup your netbook's BIOS so that it will boot from the USB, not your hard disk. If you don't know how, there are a lot of references in the Internet, such as this one.  Try googling "how to boot from a usb"

Second, you must be sure to be connected to the Internet.

Here's a picture of the netbook, with the USB and Internet (blue cable).


1. Start up your netbook, with the UNE usb drive. A few seconds later, if all is well, you should see the Ubuntu splashscreen and its purple wallpaper.

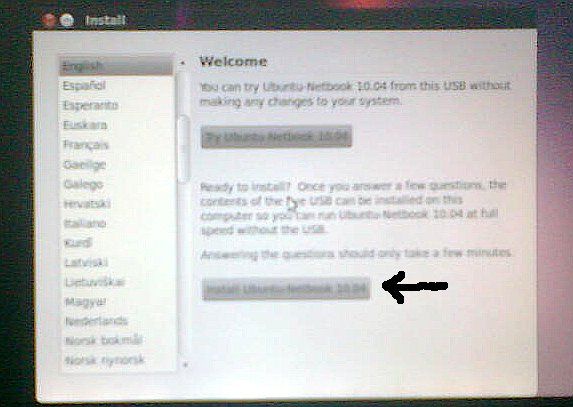
2. On the Welcome screen, click on Install Ubuntu button. It will then setup your clock.

3. Tell Ubuntu where you are by clicking on the map. Then click on the Forward button.
4. On the keyboard layout, I never had to do anything but click the Forward button.

5. On the prepare disk space, I chose the erase and use the entire disk, since I was prepared to completely format the netbook.  This is also the option to pick if you are installing Ubuntu on a new computer.

I worked blind at this point, as the buttons didn't fit on the netbook's tiny 8-inch screen.  I pressed the TAB key about 4 times to get to the invisible Forward button.

6. On the Who are you screen, fill-up the blanks and don't forget your password.  Then click the Forward button.

7.  Finally, ready to install!  Go ahead and click on the Install button.
8. A progress bar will now appear.  This will take a short or long time to complete, depending on your Internet connection's speed. After it completes, click the OK button to restart the computer.

Here's the netbook, after the restart.

Eight steps to install - not bad!

Here's a good place to go next.

Netbook specs:
  • Brand -  Blue (made in China)
  • CPU - VIA C7-M 1000MHZ
  • 1 gigabyte memory
  • 40 gigabyte hard disk, 31 gig free space after installation
  • 8" LCD screen

Monday, May 3, 2010

Eye-candy on Ubuntu Lucid Lynx

My desktop:
Cool transparent menus:

Sunday, May 2, 2010

Lucid apps replaced

Not too happy with some apps that come pre-installed in Lucid.

1. Empathy out, Pidgin in.
2. Evolution out, Thunderbird + Lightning in.
3. gnome-screenshot out, Shutter in.

To remove apps in 1 & 2, I used Ubuntu-tweak.  Nice app, this one.
Helped make it easier to install the following:

1. Pidgin - for Yahoo, MSN messenger
2. Shutter - for getting screenshots
3. VLC - for my music, movies
4. Gimp - for my photo-editing
5. Audacity - for my audio-editing
6. Dia - for my flowcharts, diagrams, Visio-like 
7. Chromium web browser - just for variety, in case I get bored with FireFox

For these, I used Ubuntu's Synaptic Package Manager:
8. Thunderbird 3 - my office email
9. Ubuntu-restricted-extras - for a whole lot of YouTube viewing, Java for Firefox
10. checkgmail  - for my multiple GMail accounts
11. g2ipmsg 

And some manual installations:
12. GoogleEarth from the Medibuntu package, pretty simple double-click on the debian package 
13. Truecrypt - another simple install double-click on the deb package

cool lucid!

Pleasant surprises in Ubuntu 10.04:

These packages are now in the repositories by default, making installation a breeze, via Synaptic Package Manager.

1. Thunderbird 3
2. IPMsg (package name: g2ipmsg)

The latter renders my previous IPMsg posts obsolete with Lucid.